Monday, April 29, 2019

Week 15

Wrapping up the semester we decided to fly one last time with the Bramor. We picked the Purdue Wildlife Area. Here they have test fields that they study for various plant and vegetation growth. The weather was good to fly in other than potential rain. As the lead flight engineer my task was set up and break down of the Bramor. Me and Ian packed the parachute for the flight the day before, but within the 24 hour limit that is required. We also made sure the batteries were charged and packed. The setup went perfectly, one of our quickest set ups. We had set up the Bramor multiple times at this point (dry runs and actual flights). I took a video of the launch since this was our last time flying this air frame.

ffffffffffffffffffffffffffffffff   This video shows Ryan launching the Bramor.
                           As seen, Evan callouts when Ryan is able to pull the launch cord.


As always, I was nervous for the parachute landing (due to the nature of it) but it deployed nicely. I am very confident in my ability to pack the parachute but it was nerve wrecking regardless. After the flight Evan gathered the data and told us that over 1600 photos were captured, totaling about 160 GB of data. This semester was a fun and interesting one. I'm glad I was chosen to be the lead flight engineer. When I graduate I would like to get into systems engineering or design engineering. Being able to learn more about complex unmanned systems has broaden my knowledge on aviation. I work very hard on my other major AET(Aeronautical Engineering Technology). I would like to incorporate both my knowledge of UAS and AET so I can get a career that involves design of unmanned technology. While I am not very interested in career path that deals with GIS, it is still great to know. If I were to get a liaison position, it would be good to know both the engineering side and the data side.

I would like to take a moment and thank both Dr. Hupy's for their time and effort in this major. Dr. Hupy was new to teaching at Purdue and did a great job focusing our time into something that we could use in the career field. I would also like to thank my class mates I worked with these past four year, we made a great team and have tons of fun learning.

Thursday, April 25, 2019

Week 14

Winding down the semester, me and Ian started the final video edits and finishing touches for the parachute packing video. Initially we thought the best idea would be to capture us packing the parachute from start to finish then do a voice over. We ultimately decided that we would instead insert photos of the training manual. This would include graphics of the training manual on how to pack the parachute. This would limit or even eliminate the need to open the training manual and search through it to find the section on packing. The parachute packing section in the manual also needed to be worked on. There were sections that did not meet our expectations. In the beginning of the video, we put disclaimers and guidelines to follow. These included following the video exactly how it is, asking instructor for further information if needed, and not packing the parachute if the packer was not 100% sure of their actions. We put these in here because the parachute is the only way to land and is the most important item on the air frame. Not packing it correctly could lead to catastrophic damage not only to the air frame but also to the sensors on board.
Using Windows Movie Editor we cut and pasted different parts
of the video. We also sped up redundant parts to eliminate wasted
time.


At the beginning of the video, viewers are instructed to
pause the video when training manual content shows up.
This enforces the notion that all steps will be followed exactly. 


The video did not take us long to make. The edits and making sure we put everything in the video that had to be said did take us awhile. We made slight changes to our content by adding in some addition steps. Something me and Ian did not do during the semester that we thought would be a good idea is to put a label on the parachute bag. This would include the packers names, date, and time. For future classes this would show who packed the parachute and when in case anything were to happen.  Below is the link final video.


A graphic of the parachute bag pre-packed shows packers
how the bag should look before it is placed in. 


https://purdue0-my.sharepoint.com/personal/iwilley_purdue_edu/_layouts/15/onedrive.aspx?id=%2Fpersonal%2Fiwilley_purdue_edu%2FDocuments%2F419%2FBramor%20chute%20fold%20training%20video%2FBramor%20Chute%20Training%20Video%2Emp4&parent=%2Fpersonal%2Fiwilley_purdue_edu%2FDocuments%2F419%2FBramor%20chute%20fold%20training%20video&cid=17920ed4-c8c1-4fcf-a1d9-988614b79118


Monday, April 15, 2019

Week 13

Due to poor weather conditions our task was shifted from collecting data to another project. Some students set up for aviation day and others focused on their own small projects. Me and Ian had a small project that was making a video for how to correctly pack a parachute. We made this video in hopes that future students would be able to learn how to pack the parachute. When we learned how to pack the parachute we had to go strictly off directions on a training manual with very limited pictures. Having a video or slideshow would help tremendously by letting students see visually how to do it. Me and Ian first set up the camera so it could see the whole parachute. We discussed how we wanted to do it. Our plan was to video tape it with us doing in multiple sections. Since we were in a room with other people we also decided that doing a voice over for the video. This would also let us watch the video after hand and comment on the packing. Having to talk them through the process while packing the parachute could lead to missing information. While taking the video we also took photos up close to show finer details such as the folds and brake line. We took the videos in segments so that we could trim out sections that weren’t needed. Ian has put the videos into a video editing software so he could put in transitions and trims. The instructional video is nearly complete, we will look it over a couple more times and have someone else watch the video and pack a parachute before we finalize it. If there are any issues with the video, then the test run should show where the flaws are.

Monday, April 8, 2019

Week 12

As the weather was great, we decided to fly another mission. This time Ryan flew his M100 with the multi-spectral camera to gather more data. We also flew the Bramor to capture more of the river and the flooding that had occurred around it. Beforehand, me and Ian packed a parachute since the time after packing the previous one had expired. The manual states that there cannot be more than 24 hours between packing the parachute and release. This is mostly due to the creases in the parachute itself. If the creases stay then it can hinder the opening of the parachute, potentially causing a mishap. Teams were the same as last time and everyone participated in the pre-flight checklist.

Parachute packed and ready. The dressing of the cords, while important,
is not as important as making sure the strands do not cross over. The overall
quality of this chute was great and opened up perfectly.

This week me, Thomas, and Kyle started to make good headway on the poster. The poster is for the SATT presentation of capstone classes for the technology department. Initially, our poster was going to talk about the similarities and differences between Drone Logbook and Measure. Due to the weather, we were not able to get many flights in to test out the two software. We shifted our focus to crew resource management within UAS operations. Below you will see the final product. As you can see we first define what CRM is and how it applies to many applications, not just UAS. This is to introduce people into this concept that might not know what it was beforehand. Then on the right of the poster we point out different applications we used in our operations. Measure, Drone logbook, Trello, Google Drive, Groupme, Zello are all utilized by our operation in some aspect that was notable. We gave we brief description of each app after some constructive criticism from class. Our rough draft did not have any description so viewers might not have any idea what some of these apps were. Finally on the bottom right we described how CRM effected our day to day operations. In there talks about how we used roles, leadership, and crews to hand out roles to team members. The checklists that we used and how we used them were also highlighted.

The final draft for the poster symposium. Class photos of our flight manager
(Kyle) training the class on the Getac. The poster highlights how we use CRM
in UAS operations at Purdue.

Monday, April 1, 2019

Week 11

The weather was great and the planes were ready. For this week we were finally able to complete a mission with the Bramor. When I first entered the room I was tasked with packing the parachute. The parachute is the only way to land the Bramor so it is imperative that it is done with care. The parachute must be packed within 24 hours of the mission. This disrupts the operation because me and Ian must come in early to pack the chute. Me and Ian were tasked with packing two chutes. We had already packed parachutes before so we made quick work with it. While we packed the other groups went out to the test site to set up. As we arrived the groups were performing the pre-flight checklist. I took part in setting up the catapult and airframe since I am the lead flight engineer. Although I was helping, I did not take full control of it. I supervised it since I already knew the ins and outs of the setup. I wanted someone else to do it so they could gain some experience setting up. At this point in the set up, we were aiming the catapult so we could take off. One thing we could change about what we did was placement on setting up. The group that went out set up the catapult in a spot where we could only launch it North. This was highly problematic because we had a tail wind. At the time of setting up, wind speed was negligible, but once it got closer to launch the wind speed picked up. Me and Ian tried to move the catapult so instead of a tail wind it would be a crosswind. We couldn’t launch into a headwind due to obstacles. We set the Bramor onto the catapult with it ready to launch. After we winched the rubbers on the catapult, we were ready to launch. I was tasked with pulling the release pin. We set the aircraft into launch mode and I pulled the lever for release, and it took off.

The Bramor set up, catapult not armed. The catapult in this photo
is set up incorrectly. This is the set up with a tail wind.

The launch was rough, with the tail/cross wind that picked up, the Bramor also didn’t even take off. It was released off the catapult and immediately started sloping towards the ground. The motor eventually picked up the slack and took off. Me and Thomas were visual observers so we went to our spot in the parking lot. During the whole flight, my group and the launch group could see the aircraft. This could mean that we didn’t need the two other visual observing groups. After the mission was completed, it was time to land with the parachute. The Bramor rallied then started it descent to land. It popped the parachute and started descending. It was gliding very closely to the road, I am not sure what went wrong with the estimate slopes, but it was only about 50 feet from the road. We picked the Bramor up and recovered it safely with no mishaps for our first mission. Other than the parachute being tangled, it was a complete success.

Bramor set up, catapult armed. Catapult ready to launch
the catapult was moved from its last position to prevent a tail wind.
This position had a slight crosswind. 

Wednesday, March 27, 2019

Week 10

As the spring weather warms up we are going to start planning to go out to fly. Since the setup for the Bramor was so crucial we spent this week running more dry runs setting it up. This time we had different members on equipment and ground control. Since I had done a lot of the setting up I decided to take a step back and let Evan set it up. I oversaw the whole operation of the setting up of the air-frame
Bramor on a level surface for sensor calibration.
Small amounts of rain can be seen on the air-frame
luckily the air-frame is waterproof.

The Getac is the main interface for the Bramor. Here
you can see us setting up landing. loiter, takeoff
and rally points.


Bramor set up outside. catapult rubbers on. At
this point the Bramor is still being setup. Notice
the top hatch still uncovered.
of the Bramor and the catapult. We took times again and tried to find more flaws in the setup. This time was different from the others because we were able to take it outside to complete more checklist items that involved GPS. When indoors, GPS cannot connect to the aircraft because of the interference. The buildings roof has more than enough interference to completely block all signals. When we went outside it was raining so we had to quickly acquire satellites then bring the Bramor under cover. We were able to acquire the minimum amount of satellites for a little while but it was short lived. The cover still blocked satellites, but we were able to complete most of the checklist. Including mission mapping, rally points, take off points, and landing points. We had never done this before so it helped out a lot. After we set it all up we tore it down and came up with a plan for Monday. Next Wednesday looks like great weather so we are planning to do an actual mission then. Monday will be prep work for Wednesday, which will include batteries being charged and parachutes packed.

Monday, March 18, 2019

Week 9

Since the weather was still beyond our operational limits, our class met inside to perform more dry runs on the new airframes. Our first airframe was the Bramor, this time around we organized it similar to how we would in the field. We had one person on hardware (someone who will essentially put the Bramor together), one person on ground control (someone who has the tablet), and someone on the checklist reading it off. We timed each run, jotting down notes on what needed to be improved and what seemed to be running smoothly. We rotated out each role to get a feel of what needed to be done for each task.

The groups that completed the run through. The improvements are
listed on the right. This lets us see as a whole class what needs to be
improved, letting us fly more without mishaps.

This week we also started the operation run through of the DJI M600. Ryan is very familiar with this platform so he supervised us as we ran through the operation of it. We completed the checklist he made for it and gave suggestions as to what needed to be fixed or added.The M600 is much more simple than the Bramor. Since the class has plenty of experience on quadcopters, the M600 should be a breeze for us. The only parts we are unfamiliar with are the gimbal and landing gear assembly. We discussed how the landing gear fits on and the operation of it. The two notches on both the top and bottom of the assembly are orientation specific, meaning they can only fit properly with the orientation correct. Ryan should us how they attach and where the notches are supposed to go. 
Ryan showing us the details on the sensor. He took off the lens
and showed us how it worked and the things we need to check
for before operation (dirt, rocks, debris...etc)


M600 completely put together, this was set down after we put the
legs on the frame.

Friday, March 1, 2019

Week 8

In week 8, the C-Astral Bramor came in. Since this platform is going to define this program this was of utmost importance, especially since my main role for this class is main flight engineer. I will become familiar to the setup, operation, and structure of this platform. My job will be to train a single team to operate this fixed wing. Since everyone should get time on this platform, we will cycle out 1 person from the main team. This will ensure everyone gets training with the Bramor. When we first opened it, it came in two cases. One case had the catapult and one had the platform with accessories (except the 42 megapixel camera, which was included with the catapult).
In the picture below, you can the Bramor in one case, then the catapult in the other. Our task was to set it up with the given checklist. Kyle was in charge of reading off the checklist items, and I was following the tasks given to me by Kyle.
Air frame (Box above)
Catapult (Box below)
The wings are stored in an upper compartment
in the air frame box.
This Bramor was special due to its sensor package. This one had a Red Edge Altum integrated into its air frame. It
had special EMI shielding measures and mount design.


Below shows a photo of the top of the flying wing. The cover fits into the top by a latching pin and a lip that slides into the air frame. To us, this seemed like a design flaw, especially since the lip had a broken edge which made it very difficult to slide the lip into the slot. The cords in the photo are used to secure the parachute to the air frame. This is the only known method of safe landing so it is crucial. The two rubber tubes in the top middle of the photo is part of the pitot tube system. Looking just past the leading edge of the wing you can see the black pitot tube. The compartment with the "remove before flight" tag is where the parachute is held and deployed. It is deployed by a spring board that launches it out into the air, away from the propeller. Looking closely you can see tape on the air frame next to the red triangles. This tape is one of the important checklist items, its task to ensure redundant fastening of the wings to the fuselage. A feature you cannot see but is included on the air frame design is vortex generators. Just behind the leading edge of the wing is a piece of thick material that disrupts airflow over the top of the wing. Vortex generators are used to delay flow separation at high angles of attack by re-energizing the boundary layer. Since this aircraft can be subjected to high angles of attack to compensate for high winds, this is helpful for functionality. 
Bramor checklist dry run. This air frame has some interesting features that makes it unique.
Some of the parts on this are also 3D printed such as the engine cooling cowl. 
After running through the checklist carefully we did find some flaws with the checklist. It says to open to parachute port which normally wouldn't matter, but it says to do so before the aircraft has power. Which the only way to open the parachute port is through the ground control station. We will fix this by making small modifications to the checklist.

After we set up the air frame we familiarized ourselves with the catapult. This is the only method of launching the Bramor and it is crucial to know its functionality. The catapult works by using elastic cords under tension. You wrap the rubber to two points on the front of the catapult, then you use a winch to put the rubber under high tension. Once you are ready to launch, the user pulls a safety pin, then pulls a cord. The Bramor is launched quickly off the catapult and into the air where it automatically turns on its motor then proceeds to the mission. Below is a photo of the Bramor set up on the catapult and "ready" to launch. Since it was indoors we took precautionary measures to ensure it wouldn't take off. The red cords leading form the back to the front of the catapult launch the Bramor, without these it would never be able to take off. One of the checklist items is to ensure that no cords are tangled, this could cause a difficult launch or even a crash. The winch is down near the bottom of the catapult. Like a normal winch, you crank it to slowly build up tension on the cords.
Bramor and Catapult all set up ready to fly. Since this is inside, there are certain checklist items
we could not complete (GPS, wind speed, weather...etc) we did our best to complete a dry run.


Catapult pre-setup. The elastic cords have not been attached to the frame of catapult. The air frame
bucket is made from carbon fiber and weighs very little. This helps with weight reduction for a faster 
launch. Giving the bramor more speed to work with.


Monday, February 25, 2019

Week 7

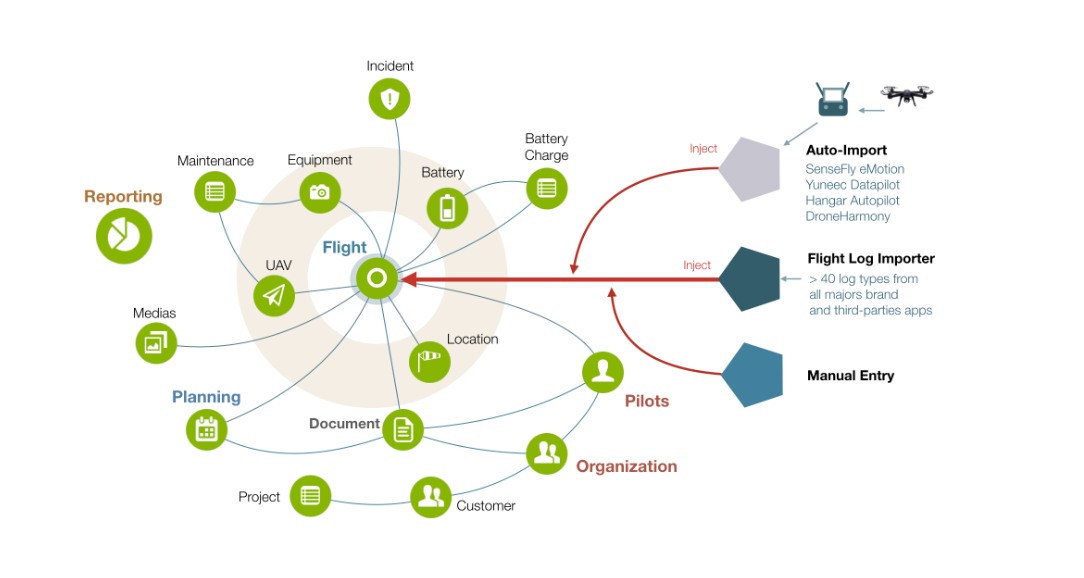
Since we are still unable to fly in the field we are still working on posters and doing dry runs. This week poster work was the main focus. Me, Kyle, and Thomas are doing our poster on crew resource management and the big differences between Purdue's Drone Logbook and Measure. When looking at both the sites, Drone logbook seemed to have many more features. Checklists, times flown, operators, drones, inventory lists...etc the list goes on. It may need some more work to be more user friendly but it does have many useful features. We haven’t been able to use Measure so we don’t know what can go on the site. This impeded our ability to accurately judge both, the only aspect that we didn’t like was its lack of features. The site didn’t seem to have any tools, or at least any that we could find. We looked on Measures website to see what they claimed to have and still found nothing. On drone logbook we found a graphic with lots of claimed to have features. (Fig 1)


To us, this showed that drone logbook was able to advertise what their software could do, while Measures advertisement is much more broad and less specific. There were no specific graphics on their site that showed what it could do. But all this could only be due to the fact that we have not been able to utilize the software. We haven’t been able to fly yet so there could be features that are only accessible once flights have started. We will find out more once we have flights in. Below (Fig 2) is the beginning of what our poster is going to look like, we still need more data on CRM and both software's before we can make more concrete conclusions.


Monday, February 18, 2019

Week 6

In week 6, I was able to inventory the rest of the batteries for the DJI M600. The flight teams have been created based on what day/time they were able to fly, with the exception of Krysta. She has a revolving work schedule, meaning she sometimes works different days of the week. After looking at the times for our class to fly, there may need to be some changes. Most days a group of 3 or more can only be together for 1 hour. This is unreasonable because just getting the equipment and ground control station setup can take an hour. Those who are able to fly the most will be on the Bramor airframe. This is due to the complexity of the preflight checklist. I want to keep a flight crew specially for the bramor. This airframe is very costly and cannot afford small mistakes. One way of working everyone into the Bramor team is to switch out one of the team members on it. So if the team were to have 3 people. Person 1 & 2 would always be on the team but person 3 would be switched out with the other members. This would ensure everyone would have the chance to gain familiarity with it without significantly increasing the chance of an incident. There is still the issue of people simply not having the time to be able to fly, but that will have to be discussed in more depth. Since the weather is still unflyable we have been tasked with creating posters for the SATT poster symposium. In my group is Kyle and Thomas. Our poster idea revolves around flight crew and crew resource management (CRM). For our poster we will talk about how CRM is utilized in UAS operations, this is a key role for these type of operations. We have not been able to discuss the poster more throughly, but we will be working on it solely next week.

Sunday, February 10, 2019

Week 5

During week 5, we had a dry run test for mission operation. What this consisted of is a theoretical mission that needed to be completed. As a team, we decided where the best location of our test site (West Lafayette Amphitheater) would be for a major flood. As a team, we chose what platform we would use, what day would be best suited, and how we would perform the mission. We picked out one of the shape files on our map then proceeded to choose a location where we would launch our aircraft. Since the mission would be to capture flooding, we would be utilizing an RBG camera with the highest resolution as possible. Which meant using the Bramor with its normal RBG camera. Theoretically before hand we would have video of the site area. Since we would have both, we would be able to compare the results before and after. We could also compare our results to the Tippecanoe GIS maps. The test run was a great idea and showed us a lot of could be flaws in our operation. We still need to work out minor flaws but the dry run was a success in showing us how we would do this operation if it came to be. 

During this week I also continued to pack parachutes for the Bramor. Since the parachute is the main method of landing for the Bramor, it is of paramount importance to get this up and running. Still waiting on the Bramor to create a checklist and its appropriate documents. 

Tuesday, February 5, 2019

Week 4

Due to inclement weather, class was cancelled on the day we planned to try out a dry run of our operation. What we had planned to do was get everyone together and simulate an operation. We would simulate us going out into the field to gather data from our test site. Since we wouldn't be flying, we would load an SD card onto the platform with data already on it. Then we would act as if we just came from from the field with all of our data. The flight team would then organize the data correctly and put it into the correct folder for data processing. This dry run would show us, as a class, what processes could be further developed or improved. A dry run would also give us a good feel as to how the operation should feel once we get into the real flights.
As for the flight engineering, Ryan has made an M600 checklist that he has put on drone logbook. We have reviewed the checklist but still need a dry run to test it out.

Monday, January 28, 2019

Week 3

Due to extended delay on C-Astral's Bramor, I switched my focus from parachute packing and creating an instructional video for it. Me, Ryan and Ian started to brainstorm a checklist for the M600. We also started to inventory our equipment. The M600 has a total of 18 batteries separated into 3 groups of six. To ensure we use the same six batteries together they are labeled different colors. Yellow, blue, and purple were the colors chosen. While we started to make a list we decided that using QR codes to label the battery would be a good idea. I made QR codes for 6 of the batteries and have them saved.
The class also started using drone log book, which will ultimately help me with creating checklists and inventory lists. The site has its own category for flight, maintenance, inventory, personnel, documents and incidents. Drone logbook will be very useful for in field use of checklists and flight records. Planned for next week is creating a checklist for the M600 on drone log book itself, this will help condense all of the classes resources down to a few sites. If any maintenance is done on any of the platforms we have a section dedicated to jot down any notes or major maintenance done.

Thursday, January 24, 2019

Week 2

As the lead flight engineer I was tasked with learning to pack the parachute for the Bramor. For this week me and systems integrator, Ian Wiley practiced packing the parachute. The packing guide consisted over 35 steps. We first started out by hand deploying the parachute, after that we made room on a desk so we could have room to fold it. Step by step, me and Ian followed the procedure taking notes of what would be good to have in an instructional video. We were able to pack it twice during the time of our lab. The first time packing was much more difficult than the second, due to us never packing this parachute before. The most difficult part we agree would be the most important part. The weaving of the cords at the end. If the cords are tangled then the parachute could have a chance of not being deployed, causing the Bramor to potentially take a very hard landing.  This is the step me and Ian are working on the hardest due to the difficulty of it.
Bramor Parachute packed
(the most important aspect is the cords being woven correctly so it deploys)


Bramor Parachute during packing (1st attempt)
During this phase of the packing, we separated the 8 gores into a neat pile. 

Monday, January 14, 2019

419 Capstone Preparation

In our first week of class, the class had discussion on how to classify the data we collect from our flights. Evan, as the data analyst, had two options that were discussed. In the photos below he drew out how the data would be organized. In class we also set up folders for our own use in this class along with mapping a drive.
 Here on the left is the diagram on how data will be collected, stored, and released. There is also the naming convention for the data on the right hand side of the photo. This was the main topic of discussion and took us most of the time.

For my job, I was able to see the parachute and look into the folding of it. We received the Bramor user manual and in it was the guide to packing the parachute. It consisted of 35 steps.


Monday, December 3, 2018

Understanding Key UAS Fundamentals through Applied Research

As the semester winds down, our class has been tasked with a group capstone project. Our class met two times to discuss our capstone project and our roles in it. We all first asked ourselves what we would be interested in for a capstone project. To begin, we all wanted defined roles that we each were specifically interested in. We went around to describe what each of us wanted to get from this project and what each of us were interested in. We described what was essential to a UAS operation that would gather data and eventually deliverable data. We knew that there was going to be managers that would oversee the whole operation and be able to communicate with Dr. Hupy about how the project is going. Next there was going to be people in charge of data, flights, writing, ground control, system integration, payload integration, operation management, and flight engineering. All of these tasks were pointed out as essential and that someone was going to be in charge of it fully. They would have it as a permanent job that would need to be carried out to ensure success. Within these jobs, I chose to take flight engineer. For my task, I will be in charge of ensuring all members are properly trained to operate the platforms along with the sensors aboard. This is crucial since Indiana weather is generally unpredictable and can leave the group members without flying for extended periods of time. Ensuring that each group that flies is properly trained on each platform will reduce any chance of mishaps.
Although each group member has permanent roles, everyone has rotating roles that will ensure everyone gets to participate in the projects many jobs. These will mostly be assistant jobs, meaning that you will help someone with their permanent role. This will allow everyone to get a feel of how the other jobs are done. Our group will also be broken up into teams, or flight crews. They will be permanent and will be chosen depending on everyone's schedule for the next semester.

Tuesday, November 27, 2018

Video GeoTagger

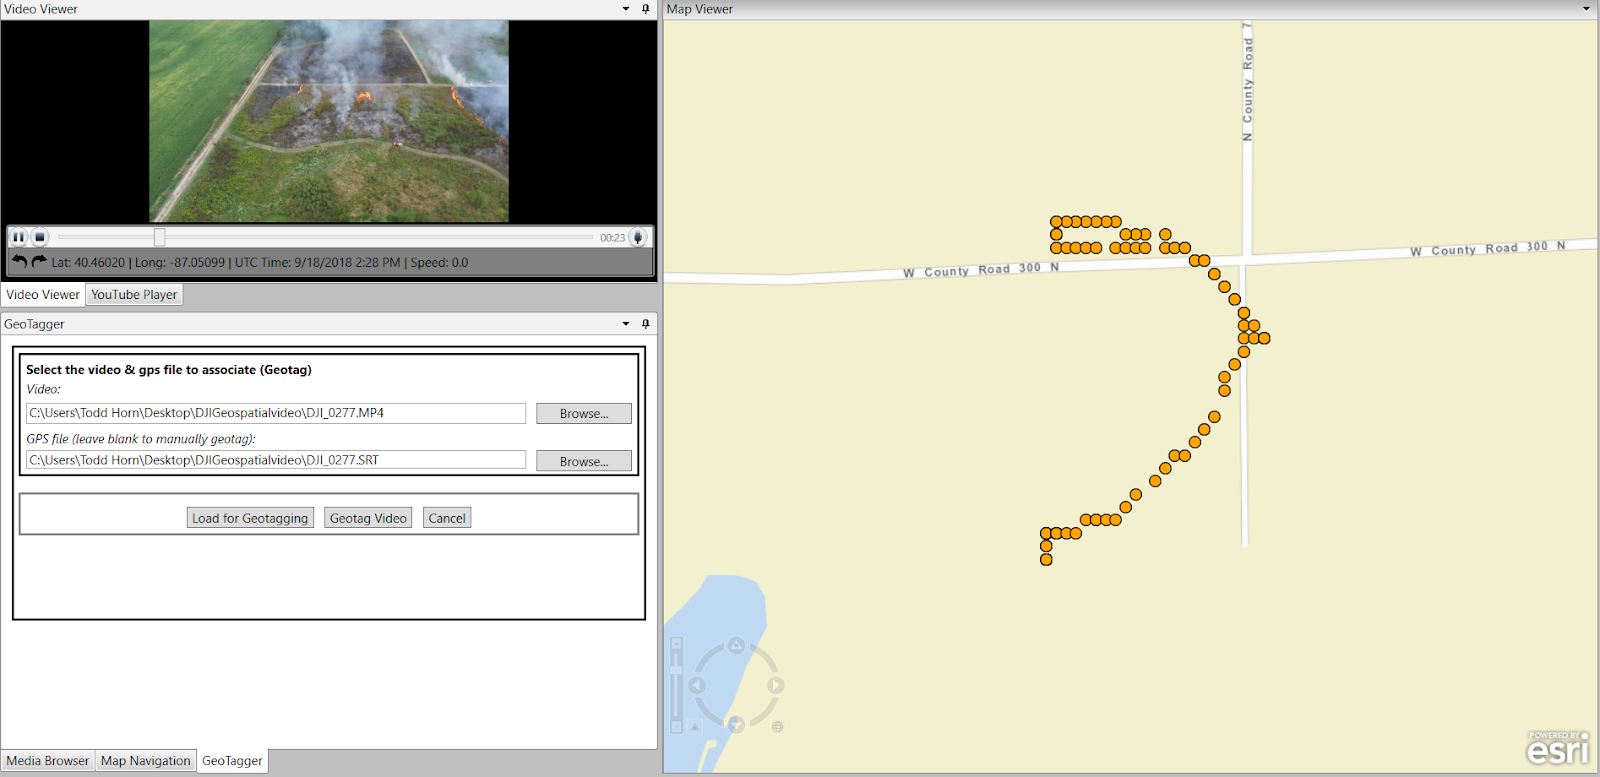
Video GeoTagger is a free online software used to create geolocated videos. What this means is that someone can overlay a map, GPS points, and their video to give a user the ability to see where exactly the video was taken. This is particularly useful when the data is being analyzed by someone who might not have been at the sight where the video was taken. For our use, we have a drone taking a video and we were tasked with geotagging it. Below is the first video that was completed using the  free geotagger software. The interface is simple and easy to work with. You simply load the video into the software then load the GPS points onto the map. You start the video and tag the video at the start, then watch the entire video then tag it at the end. Making sure that the points match up exactly with the time shown on the video. 

This was done once more with another video, but exact same process.


GeoTagged videos can give the viewer much more information on the flight, which is why it is used a lot for videos that put out data. It can show where exactly the video was being taken so that someone can see where it was taken. It gives perspective to the viewer so that they can analyze data accurately. While these videos are useful in a lot of circumstances, they require ground control points or referenced locations to be most useful. Anywhere that doesn't have a noticeable feature, such as a tree, man made structure, or river would be hard to use this software. The software that we used was free, so it does not have the same accuracy that a survey grade software would have.    

Thursday, November 15, 2018

Impact of altitude on high-resolution multi-spectral remote sensing for hardwood forest species delineation


               The research project chosen is looking into the impact of altitude on high-resolution multi-spectral remote sensing for hardwood forest species delineation. We are looking to see if there is a considerable difference in the collection of data with a manned aircraft versus an unmanned aircraft. Altitude is the biggest factor between the two, the unmanned system will fly lower while the manned will fly at a greater altitude.  The purpose of an annotated bibliography is to let the reader or viewer get an insight on what has been done that concerns our research. An annotated bibliography consists of articles, journals, research papers, and books that have been published (preferably peer-reviewed). A research timeline is also an important aspect of this research. A research timeline lets groups see where they should be in terms of the process of the research. This can be done in a lot of ways but the most common one is a Gantt chart.

(Adão et al., 2017)
Adão, T., Hruška, J., Pádua, L., Bessa, J., Peres, E., Morais, R., & Sousa, J. J. (2017). Hyperspectral Imaging: A Review on UAV-Based Sensors, Data Processing and Applications for Agriculture and Forestry. Remote Sensing, 9(11), 1-30. doi:10.3390/rs9111110
This article focuses on the use of hyperspectral sensors in UAS use. It addresses the advantages of hyperspectral sensors over the use of RGB or NIR cameras for data acquisition for agriculture and forestry. This is a great source of information for this because it highlights drone usage and checklists for those platforms and how to effectively collect that data. The only setback from this article is that it doesn’t talk too in-depth about the use of this for certain scenarios in forest and agriculture.
(Bonnet, Lisein, & Lejeune, 2017)
Bonnet, S., Lisein, J., & Lejeune, P. (2017). Comparison of UAS photogrammetric products for tree detection and characterization of coniferous stands. International Journal of Remote Sensing, 38(19), 5310-5337. doi:10.1080/01431161.2017.1338839
This article goes into depth about the use of UAS to detect trees and asses forest attributes for coniferous trees. More specifically the age of the trees and the surrounding age of the trees. While this article is great for potentially seeing how they did it, it doesn’t give us a great idea of what to expect for ours. The group could potentially get some ideas from this paper on how to go about doing our research. It also does not compare it to manned aircraft.
(Gabrlik, la Cour-Harbo, Kalvodova, Zalud, & Janata, 2018)
Gabrlik, P., la Cour-Harbo, A., Kalvodova, P., Zalud, L., & Janata, P. (2018). Calibration and accuracy assessment in a direct georeferencing system for UAS photogrammetry. International Journal of Remote Sensing, 39(15/16), 4931-4959. doi:10.1080/01431161.2018.1434331
In this article, the studying being done is to see how well they can calibrate and function a custom built multi-sensor for direct georeferencing. This would enable them to get centimeter level accuracy for mapping an area. This article shows a lot about RTK, GNS, and INS which could be used for our project to get the data most accurately. The article has good information on these but for our use the article does not give much about the actual data being collected.
(Getzin, Nuske, & Wiegand, 2014)
Getzin, S., Nuske, R. S., & Wiegand, K. (2014). Using Unmanned Aerial Vehicles (UAV) to Quantify Spatial Gap Patterns in Forests. Remote Sensing, 6(8), 6988-7004. doi:10.3390/rs6086988
This article is looking into gap distribution of forests being reflected by the impact of man-made tree harvesting or whether it is naturally occurring patterns of tree death. It goes into more causes that could be having this effect on the forest, they use UAV because of the small gaps between the trees. Those cannot be measured accurately with manned planes. This article is great because it shows how they utilized a drone for this reason and how it worked. It goes into more detail than we know of, but it is still good to get a knowledgeable base one. This article does not go into detail on how much more accurate this data is than if it was a regular manned plane.
(Lisein, Michez, Claessens, & Lejeune, 2015)
Lisein, J., Michez, A., Claessens, H., & Lejeune, P. (2015). Discrimination of Deciduous Tree Species from Time Series of Unmanned Aerial System Imagery. PLoS ONE, 10(11), 1-20. doi:10.1371/journal.pone.0141006
In this article it addresses how and when UAS should be used to efficiently discriminate deciduous tree species. In goes into detail that they are trying to find the best way to achieve the optimal species discrimination and when. They state when they start and when they end, then classify the data to discriminate tree species. This is a great article for our group since this is very close to what we are doing. Instead of doing deciduous tree species we are doing general tree species and if there is a difference between manned and unmanned. Very good article for our group.
(Manfreda et al. 2018)
Manfreda, S., M. E. McCabe, P. E. Miller, R. Lucas, V. P. Madrigal, G. Mallinis, E. Dor, D. Helman, L. Estes, G. Ciraolo, J. Mullerova, F. Tauro, M. I. de Lima, Jlmp del Lima, A. Maltese, F. Frances, K. Caylor, M. Kohv, M. Perks, G. Ruiz-Perez, Z. Su, G. Vico, and B. Toth. 2018. "On the Use of Unmanned Aerial Systems for Environmental Monitoring." Remote Sensing 10 (4). doi: 10.3390/rs10040641

This study goes into the use of UAV in environmental monitoring. It discusses how this is done mostly by ground and satellites but now it can be done easier and much more efficient with UAVs. It talks about how ground and satellites have certain constraints that limit them while UAV have little that limits them.  The papers aim is to provide an overview of the existing research of UAS in these fields.
(Pádua et al., 2018)
Pádua, L., Hruška, J., Bessa, J., Adão, T., Martins, L. M., Gonçalves, J. A., . . . Sousa, J. J. (2018). Multi-Temporal Analysis of Forestry and Coastal Environments Using UASs. Remote Sensing, 10(1), 1-N.PAG. doi:10.3390/rs10010024
This papers topic looks at the advantages and challenges related to UAVs for imagery and data collection in forestry and costal environments. It states that two case studies are done one focusing on chestnut tree health and the second on the sandpit of Cabedelo in different time periods. This paper has some good points mostly talking about how UAS and sensors have really taken off. Though, it does not touch base with out project too much, other than techniques used for the chesnut tree health we can only learn from how they managed to carry out how they did it.
(Puliti, Ørka, Gobakken, & Næsset, 2015)
Puliti, S., Ørka, H. O., Gobakken, T., & Næsset, E. (2015). Inventory of Small Forest Areas Using an Unmanned Aerial System. Remote Sensing, 7(8), 9632-9654. doi:10.3390/rs70809632

This article mostly looks at the use of UAVs to inventory small forests. This study uses 3D variables from UAV imagery with ground reference data to create linear models for mean height, dominant height, stem number, basal area, and stem volume. The data surrounding this topic before this study (said in the article) was said to be inconsistent and unreliable. This is a good article since we are looking at forests and categorizing them, but it doesn’t talk about species. It only touches on size and actual tree dimensions.
(Singh and Frazier 2018)
Singh, K. K., and A. E. Frazier. 2018. "A meta-analysis and review of unmanned aircraft system (UAS) imagery for terrestrial applications." International Journal of Remote Sensing 39 (15-16):5078-5098. doi: 10.1080/01431161.2017.1420941.
This article performed a search using UAS related keywords to identify peer reviewed studies. They then filtered the results to a couple of keywords. After that, they selected a subset then deeply analyzed each study. They found that UAS practices need better standardization of methods and procedures for UAS data collection and practices.
(Wieser et al., 2017)
Wieser, M., Mandlburger, G., Hollaus, M., Otepka, J., Glira, P., & Pfeifer, N. (2017). A Case Study of UAS Borne Laser Scanning for Measurement of Tree Stem Diameter. Remote Sensing, 9(11), 1-11. doi:10.3390/rs9111154
This study looks at diameter breast height of trees in forestry. They use laser scanners that create high resolution point clouds onboard UAS. The diameter breast height is estimated from a UAS point cloud. This study is good for us for methods and techniques, but the data is not too useful, they are using sensors to measure actual dimensions while we use sensors to classify data.


Timeline


Above is a Gantt chart, it is a method of tracking progress. It is used widely in many industries to keep track of the timeline that they need to follow, especially in the aviation industry. This Gantt chart was made for this study. It starts in the beginning of the school year and goes until the end of the spring semester. In the beginning, research on similar case studies to see if it has either already been done or methods which people used is looked at. It gives an outlook on how the project might go, or if it is a question that needs answered. During this time data collection is done, because they can be done independent of each other. Since the project has a manned aircraft that needs an integrated sensor, it is also put in under integration of sensors. The second half of the integration is also taking the sensor off the manned aircraft, since it could take a little longer than simply taking a couple of bolts out. After data collection begins, data analysis can also happen, overlapping with other tasks. As data analysis is going on, it runs into conclusion of the study and the paper. As the analysis takes place it will be noted. 


Adão, T., Hruška, J., Pádua, L., Bessa, J., Peres, E., Morais, R., & Sousa, J. J. (2017). Hyperspectral Imaging: A Review on UAV-Based Sensors, Data Processing and Applications for Agriculture and Forestry. Remote Sensing, 9(11), 1-30. doi:10.3390/rs9111110
Bonnet, S., Lisein, J., & Lejeune, P. (2017). Comparison of UAS photogrammetric products for tree detection and characterization of coniferous stands. International Journal of Remote Sensing, 38(19), 5310-5337. doi:10.1080/01431161.2017.1338839
Gabrlik, P., la Cour-Harbo, A., Kalvodova, P., Zalud, L., & Janata, P. (2018). Calibration and accuracy assessment in a direct georeferencing system for UAS photogrammetry. International Journal of Remote Sensing, 39(15/16), 4931-4959. doi:10.1080/01431161.2018.1434331
Getzin, S., Nuske, R. S., & Wiegand, K. (2014). Using Unmanned Aerial Vehicles (UAV) to Quantify Spatial Gap Patterns in Forests. Remote Sensing, 6(8), 6988-7004. doi:10.3390/rs6086988
Lisein, J., Michez, A., Claessens, H., & Lejeune, P. (2015). Discrimination of Deciduous Tree Species from Time Series of Unmanned Aerial System Imagery. PLoS ONE, 10(11), 1-20. doi:10.1371/journal.pone.0141006
Manfreda, S., M. E. McCabe, P. E. Miller, R. Lucas, V. P. Madrigal, G. Mallinis, E. Dor, D. Helman, L. Estes, G. Ciraolo, J. Mullerova, F. Tauro, M. I. de Lima, Jlmp del Lima, A. Maltese, F. Frances, K. Caylor, M. Kohv, M. Perks, G. Ruiz-Perez, Z. Su, G. Vico, and B. Toth. 2018. "On the Use of Unmanned Aerial Systems for Environmental Monitoring." Remote Sensing 10 (4). doi: 10.3390/rs10040641
Puliti, S., Ørka, H. O., Gobakken, T., & Næsset, E. (2015). Inventory of Small Forest Areas Using an Unmanned Aerial System. Remote Sensing, 7(8), 9632-9654. doi:10.3390/rs70809632
Pádua, L., Hruška, J., Bessa, J., Adão, T., Martins, L. M., Gonçalves, J. A., . . . Sousa, J. J. (2018). Multi-Temporal Analysis of Forestry and Coastal Environments Using UASs. Remote Sensing, 10(1), 1-N.PAG. doi:10.3390/rs10010024
Singh, K. K., and A. E. Frazier. 2018. "A meta-analysis and review of unmanned aircraft system (UAS) imagery for terrestrial applications." International Journal of Remote Sensing 39 (15-16):5078-5098. doi: 10.1080/01431161.2017.1420941.

Wieser, M., Mandlburger, G., Hollaus, M., Otepka, J., Glira, P., & Pfeifer, N. (2017). A Case Study of UAS Borne Laser Scanning for Measurement of Tree Stem Diameter. Remote Sensing, 9(11), 1-11. doi:10.3390/rs9111154

Sunday, November 11, 2018

Field Outing at Dr. Hupy's

For our lab, our class was to take video and pictures of Dr. Hupy's property. This data is going to be used for analyzing later on. The platform of use was a Yuneec H520, an orange hexacopter. While there, the ground station made a flight plan and started the flight. Before this, our class was taken around his property setting down ground control points (GCP). These are marked points on the ground that have a known geographic location. If used, GCPs must be visible in these aerial photos, so we had to place them in locations that would not be blocked by trees or other obstacles. We placed a total of 9 of these points variously around his property, remembering where they were put. For these GCPs, once done, the team is pick up the pads in the opposite direction that they placed them. For instance if you were to number them 1-9 and placed them down in sequential order, you would pick them up from 9 to 1. Once set down the drone was lifted off and started its mission. It was a success with not mishaps or incidents.

GIS Day

Main Events:

10:00 –11:00 am
Keynote: GIS for natural resources management at United Nation (STEW 206) Dr. Nicolas Picard, Food and Agriculture Organization of the United Nations

11:00am–12:20pm
Presentations (STEW 206) Spatial Humanities: What is and What Can it Be. Prof. Sorin Adam Matei, Associate Dean of Research and Graduate Education, College of Liberal Arts Race and Spatial Humanities Prof. Kim Gallon, Assistant Professor of History Forest structural diversity as a predictor of ecosystem function in North America Dr. Elizabeth LaRue, Forestry and Natural Resources My laptop takes forever, now what! Eric Adams, ITaP Research Computing

GIS day was a day to learn more about GIS and how it fits with UAS operations. Above is the main schedule that was posted (although there were more events afterwards). Although I could not make it due to illness, I was able to talk to classmates that did go to get some information about what happened. The main speaker was Dr. Picard, who was affiliated with the Food and Agriculture Organization of the United States. He talked about GIS data and how to analyze it to its full potential and also talked about mistakes other people made when trying to put out good data. The next presenter was Professor Sorin Matei, he had also talked about research projects that utilized drones. After this Professor Kim Gallon, who focused on the ethics of GIS. Professor Gallon said that people were simply looking at the numbers that we were obtaining from data capture and seeing them as just that, numbers. Similarly to comparing humans to numbers or figures on a screen or graph. Even though I could not attend, I still asked classmates for information about the talks since it did seem interesting for us in the UAS major.
In other classes I have taken, the ethical issues of treating people like a number or figure has been brought up, mainly in my remote sensing class. In my opinion it does dumb down what is actually occurring, regardless of it is serious or not. But, that does not solve much in my opinion, there isn't much people can do that will put a lasting effect on those statistics. 
For our class, we have less than 10 people but our outlooks for our career vary throughout us. Although this depended on what students want to do with this major, this major can branch out in many ways so students may want to use it for GIS applications and others may want to use it for design and manufacture. Personally, I am not interested in the data side of drones but the design and manufacturing of them. This still helps if I were to be interested in making a specialized drone for a mission that required sensors that need to be outfitted professionally. Having a team of well rounded individuals that have extensive knowledge on one area of topic can help team move forward easily. If an entire team only consisted of people with knowledge in data analytics, then they will encounter difficulty in the field where they might not know much about platform usability and troubleshooting. And similarly the other way around.
All together, GIS is a very vital market for drones. Drones are going to be used for these applications more and more. The technology is evolving at an ever increasing rate and will improve how these machines can do their job, making our job even easier.