Monday, March 18, 2019

Week 9

Since the weather was still beyond our operational limits, our class met inside to perform more dry runs on the new airframes. Our first airframe was the Bramor, this time around we organized it similar to how we would in the field. We had one person on hardware (someone who will essentially put the Bramor together), one person on ground control (someone who has the tablet), and someone on the checklist reading it off. We timed each run, jotting down notes on what needed to be improved and what seemed to be running smoothly. We rotated out each role to get a feel of what needed to be done for each task.

The groups that completed the run through. The improvements are
listed on the right. This lets us see as a whole class what needs to be
improved, letting us fly more without mishaps.

This week we also started the operation run through of the DJI M600. Ryan is very familiar with this platform so he supervised us as we ran through the operation of it. We completed the checklist he made for it and gave suggestions as to what needed to be fixed or added.The M600 is much more simple than the Bramor. Since the class has plenty of experience on quadcopters, the M600 should be a breeze for us. The only parts we are unfamiliar with are the gimbal and landing gear assembly. We discussed how the landing gear fits on and the operation of it. The two notches on both the top and bottom of the assembly are orientation specific, meaning they can only fit properly with the orientation correct. Ryan should us how they attach and where the notches are supposed to go. 
Ryan showing us the details on the sensor. He took off the lens
and showed us how it worked and the things we need to check
for before operation (dirt, rocks, debris...etc)


M600 completely put together, this was set down after we put the
legs on the frame.

Friday, March 1, 2019

Week 8

In week 8, the C-Astral Bramor came in. Since this platform is going to define this program this was of utmost importance, especially since my main role for this class is main flight engineer. I will become familiar to the setup, operation, and structure of this platform. My job will be to train a single team to operate this fixed wing. Since everyone should get time on this platform, we will cycle out 1 person from the main team. This will ensure everyone gets training with the Bramor. When we first opened it, it came in two cases. One case had the catapult and one had the platform with accessories (except the 42 megapixel camera, which was included with the catapult).
In the picture below, you can the Bramor in one case, then the catapult in the other. Our task was to set it up with the given checklist. Kyle was in charge of reading off the checklist items, and I was following the tasks given to me by Kyle.
Air frame (Box above)
Catapult (Box below)
The wings are stored in an upper compartment
in the air frame box.
This Bramor was special due to its sensor package. This one had a Red Edge Altum integrated into its air frame. It
had special EMI shielding measures and mount design.


Below shows a photo of the top of the flying wing. The cover fits into the top by a latching pin and a lip that slides into the air frame. To us, this seemed like a design flaw, especially since the lip had a broken edge which made it very difficult to slide the lip into the slot. The cords in the photo are used to secure the parachute to the air frame. This is the only known method of safe landing so it is crucial. The two rubber tubes in the top middle of the photo is part of the pitot tube system. Looking just past the leading edge of the wing you can see the black pitot tube. The compartment with the "remove before flight" tag is where the parachute is held and deployed. It is deployed by a spring board that launches it out into the air, away from the propeller. Looking closely you can see tape on the air frame next to the red triangles. This tape is one of the important checklist items, its task to ensure redundant fastening of the wings to the fuselage. A feature you cannot see but is included on the air frame design is vortex generators. Just behind the leading edge of the wing is a piece of thick material that disrupts airflow over the top of the wing. Vortex generators are used to delay flow separation at high angles of attack by re-energizing the boundary layer. Since this aircraft can be subjected to high angles of attack to compensate for high winds, this is helpful for functionality. 
Bramor checklist dry run. This air frame has some interesting features that makes it unique.
Some of the parts on this are also 3D printed such as the engine cooling cowl. 
After running through the checklist carefully we did find some flaws with the checklist. It says to open to parachute port which normally wouldn't matter, but it says to do so before the aircraft has power. Which the only way to open the parachute port is through the ground control station. We will fix this by making small modifications to the checklist.

After we set up the air frame we familiarized ourselves with the catapult. This is the only method of launching the Bramor and it is crucial to know its functionality. The catapult works by using elastic cords under tension. You wrap the rubber to two points on the front of the catapult, then you use a winch to put the rubber under high tension. Once you are ready to launch, the user pulls a safety pin, then pulls a cord. The Bramor is launched quickly off the catapult and into the air where it automatically turns on its motor then proceeds to the mission. Below is a photo of the Bramor set up on the catapult and "ready" to launch. Since it was indoors we took precautionary measures to ensure it wouldn't take off. The red cords leading form the back to the front of the catapult launch the Bramor, without these it would never be able to take off. One of the checklist items is to ensure that no cords are tangled, this could cause a difficult launch or even a crash. The winch is down near the bottom of the catapult. Like a normal winch, you crank it to slowly build up tension on the cords.
Bramor and Catapult all set up ready to fly. Since this is inside, there are certain checklist items
we could not complete (GPS, wind speed, weather...etc) we did our best to complete a dry run.


Catapult pre-setup. The elastic cords have not been attached to the frame of catapult. The air frame
bucket is made from carbon fiber and weighs very little. This helps with weight reduction for a faster 
launch. Giving the bramor more speed to work with.


Monday, February 25, 2019

Week 7

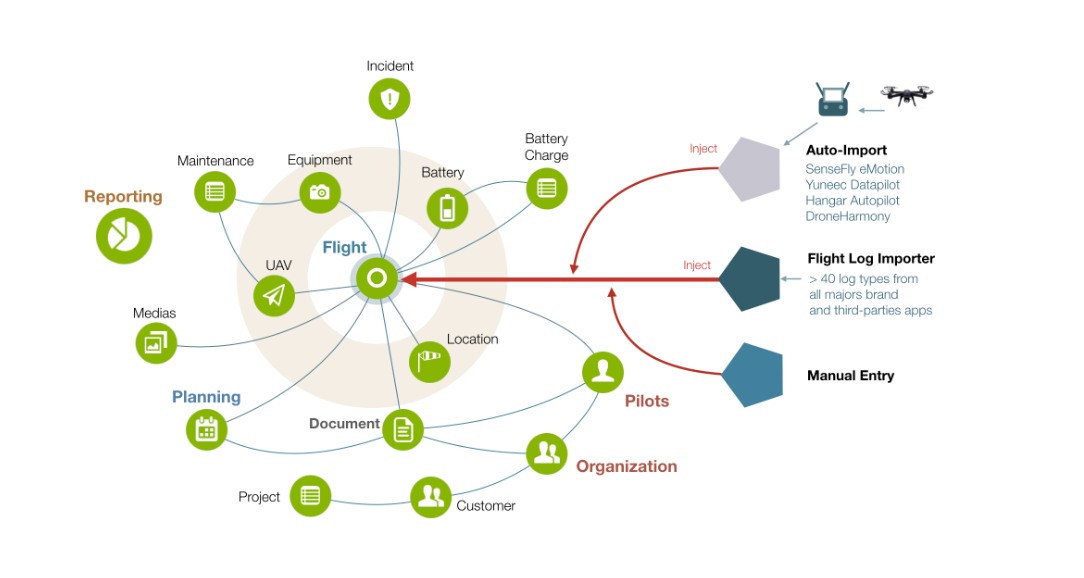
Since we are still unable to fly in the field we are still working on posters and doing dry runs. This week poster work was the main focus. Me, Kyle, and Thomas are doing our poster on crew resource management and the big differences between Purdue's Drone Logbook and Measure. When looking at both the sites, Drone logbook seemed to have many more features. Checklists, times flown, operators, drones, inventory lists...etc the list goes on. It may need some more work to be more user friendly but it does have many useful features. We haven’t been able to use Measure so we don’t know what can go on the site. This impeded our ability to accurately judge both, the only aspect that we didn’t like was its lack of features. The site didn’t seem to have any tools, or at least any that we could find. We looked on Measures website to see what they claimed to have and still found nothing. On drone logbook we found a graphic with lots of claimed to have features. (Fig 1)


To us, this showed that drone logbook was able to advertise what their software could do, while Measures advertisement is much more broad and less specific. There were no specific graphics on their site that showed what it could do. But all this could only be due to the fact that we have not been able to utilize the software. We haven’t been able to fly yet so there could be features that are only accessible once flights have started. We will find out more once we have flights in. Below (Fig 2) is the beginning of what our poster is going to look like, we still need more data on CRM and both software's before we can make more concrete conclusions.


Monday, February 18, 2019

Week 6

In week 6, I was able to inventory the rest of the batteries for the DJI M600. The flight teams have been created based on what day/time they were able to fly, with the exception of Krysta. She has a revolving work schedule, meaning she sometimes works different days of the week. After looking at the times for our class to fly, there may need to be some changes. Most days a group of 3 or more can only be together for 1 hour. This is unreasonable because just getting the equipment and ground control station setup can take an hour. Those who are able to fly the most will be on the Bramor airframe. This is due to the complexity of the preflight checklist. I want to keep a flight crew specially for the bramor. This airframe is very costly and cannot afford small mistakes. One way of working everyone into the Bramor team is to switch out one of the team members on it. So if the team were to have 3 people. Person 1 & 2 would always be on the team but person 3 would be switched out with the other members. This would ensure everyone would have the chance to gain familiarity with it without significantly increasing the chance of an incident. There is still the issue of people simply not having the time to be able to fly, but that will have to be discussed in more depth. Since the weather is still unflyable we have been tasked with creating posters for the SATT poster symposium. In my group is Kyle and Thomas. Our poster idea revolves around flight crew and crew resource management (CRM). For our poster we will talk about how CRM is utilized in UAS operations, this is a key role for these type of operations. We have not been able to discuss the poster more throughly, but we will be working on it solely next week.

Sunday, February 10, 2019

Week 5

During week 5, we had a dry run test for mission operation. What this consisted of is a theoretical mission that needed to be completed. As a team, we decided where the best location of our test site (West Lafayette Amphitheater) would be for a major flood. As a team, we chose what platform we would use, what day would be best suited, and how we would perform the mission. We picked out one of the shape files on our map then proceeded to choose a location where we would launch our aircraft. Since the mission would be to capture flooding, we would be utilizing an RBG camera with the highest resolution as possible. Which meant using the Bramor with its normal RBG camera. Theoretically before hand we would have video of the site area. Since we would have both, we would be able to compare the results before and after. We could also compare our results to the Tippecanoe GIS maps. The test run was a great idea and showed us a lot of could be flaws in our operation. We still need to work out minor flaws but the dry run was a success in showing us how we would do this operation if it came to be. 

During this week I also continued to pack parachutes for the Bramor. Since the parachute is the main method of landing for the Bramor, it is of paramount importance to get this up and running. Still waiting on the Bramor to create a checklist and its appropriate documents. 

Tuesday, February 5, 2019

Week 4

Due to inclement weather, class was cancelled on the day we planned to try out a dry run of our operation. What we had planned to do was get everyone together and simulate an operation. We would simulate us going out into the field to gather data from our test site. Since we wouldn't be flying, we would load an SD card onto the platform with data already on it. Then we would act as if we just came from from the field with all of our data. The flight team would then organize the data correctly and put it into the correct folder for data processing. This dry run would show us, as a class, what processes could be further developed or improved. A dry run would also give us a good feel as to how the operation should feel once we get into the real flights.
As for the flight engineering, Ryan has made an M600 checklist that he has put on drone logbook. We have reviewed the checklist but still need a dry run to test it out.

Monday, January 28, 2019

Week 3

Due to extended delay on C-Astral's Bramor, I switched my focus from parachute packing and creating an instructional video for it. Me, Ryan and Ian started to brainstorm a checklist for the M600. We also started to inventory our equipment. The M600 has a total of 18 batteries separated into 3 groups of six. To ensure we use the same six batteries together they are labeled different colors. Yellow, blue, and purple were the colors chosen. While we started to make a list we decided that using QR codes to label the battery would be a good idea. I made QR codes for 6 of the batteries and have them saved.
The class also started using drone log book, which will ultimately help me with creating checklists and inventory lists. The site has its own category for flight, maintenance, inventory, personnel, documents and incidents. Drone logbook will be very useful for in field use of checklists and flight records. Planned for next week is creating a checklist for the M600 on drone log book itself, this will help condense all of the classes resources down to a few sites. If any maintenance is done on any of the platforms we have a section dedicated to jot down any notes or major maintenance done.