Monday, April 29, 2019

Week 15

Wrapping up the semester we decided to fly one last time with the Bramor. We picked the Purdue Wildlife Area. Here they have test fields that they study for various plant and vegetation growth. The weather was good to fly in other than potential rain. As the lead flight engineer my task was set up and break down of the Bramor. Me and Ian packed the parachute for the flight the day before, but within the 24 hour limit that is required. We also made sure the batteries were charged and packed. The setup went perfectly, one of our quickest set ups. We had set up the Bramor multiple times at this point (dry runs and actual flights). I took a video of the launch since this was our last time flying this air frame.

ffffffffffffffffffffffffffffffff   This video shows Ryan launching the Bramor.
                           As seen, Evan callouts when Ryan is able to pull the launch cord.


As always, I was nervous for the parachute landing (due to the nature of it) but it deployed nicely. I am very confident in my ability to pack the parachute but it was nerve wrecking regardless. After the flight Evan gathered the data and told us that over 1600 photos were captured, totaling about 160 GB of data. This semester was a fun and interesting one. I'm glad I was chosen to be the lead flight engineer. When I graduate I would like to get into systems engineering or design engineering. Being able to learn more about complex unmanned systems has broaden my knowledge on aviation. I work very hard on my other major AET(Aeronautical Engineering Technology). I would like to incorporate both my knowledge of UAS and AET so I can get a career that involves design of unmanned technology. While I am not very interested in career path that deals with GIS, it is still great to know. If I were to get a liaison position, it would be good to know both the engineering side and the data side.

I would like to take a moment and thank both Dr. Hupy's for their time and effort in this major. Dr. Hupy was new to teaching at Purdue and did a great job focusing our time into something that we could use in the career field. I would also like to thank my class mates I worked with these past four year, we made a great team and have tons of fun learning.

Thursday, April 25, 2019

Week 14

Winding down the semester, me and Ian started the final video edits and finishing touches for the parachute packing video. Initially we thought the best idea would be to capture us packing the parachute from start to finish then do a voice over. We ultimately decided that we would instead insert photos of the training manual. This would include graphics of the training manual on how to pack the parachute. This would limit or even eliminate the need to open the training manual and search through it to find the section on packing. The parachute packing section in the manual also needed to be worked on. There were sections that did not meet our expectations. In the beginning of the video, we put disclaimers and guidelines to follow. These included following the video exactly how it is, asking instructor for further information if needed, and not packing the parachute if the packer was not 100% sure of their actions. We put these in here because the parachute is the only way to land and is the most important item on the air frame. Not packing it correctly could lead to catastrophic damage not only to the air frame but also to the sensors on board.
Using Windows Movie Editor we cut and pasted different parts
of the video. We also sped up redundant parts to eliminate wasted
time.


At the beginning of the video, viewers are instructed to
pause the video when training manual content shows up.
This enforces the notion that all steps will be followed exactly. 


The video did not take us long to make. The edits and making sure we put everything in the video that had to be said did take us awhile. We made slight changes to our content by adding in some addition steps. Something me and Ian did not do during the semester that we thought would be a good idea is to put a label on the parachute bag. This would include the packers names, date, and time. For future classes this would show who packed the parachute and when in case anything were to happen.  Below is the link final video.


A graphic of the parachute bag pre-packed shows packers
how the bag should look before it is placed in. 


https://purdue0-my.sharepoint.com/personal/iwilley_purdue_edu/_layouts/15/onedrive.aspx?id=%2Fpersonal%2Fiwilley_purdue_edu%2FDocuments%2F419%2FBramor%20chute%20fold%20training%20video%2FBramor%20Chute%20Training%20Video%2Emp4&parent=%2Fpersonal%2Fiwilley_purdue_edu%2FDocuments%2F419%2FBramor%20chute%20fold%20training%20video&cid=17920ed4-c8c1-4fcf-a1d9-988614b79118


Monday, April 15, 2019

Week 13

Due to poor weather conditions our task was shifted from collecting data to another project. Some students set up for aviation day and others focused on their own small projects. Me and Ian had a small project that was making a video for how to correctly pack a parachute. We made this video in hopes that future students would be able to learn how to pack the parachute. When we learned how to pack the parachute we had to go strictly off directions on a training manual with very limited pictures. Having a video or slideshow would help tremendously by letting students see visually how to do it. Me and Ian first set up the camera so it could see the whole parachute. We discussed how we wanted to do it. Our plan was to video tape it with us doing in multiple sections. Since we were in a room with other people we also decided that doing a voice over for the video. This would also let us watch the video after hand and comment on the packing. Having to talk them through the process while packing the parachute could lead to missing information. While taking the video we also took photos up close to show finer details such as the folds and brake line. We took the videos in segments so that we could trim out sections that weren’t needed. Ian has put the videos into a video editing software so he could put in transitions and trims. The instructional video is nearly complete, we will look it over a couple more times and have someone else watch the video and pack a parachute before we finalize it. If there are any issues with the video, then the test run should show where the flaws are.

Monday, April 8, 2019

Week 12

As the weather was great, we decided to fly another mission. This time Ryan flew his M100 with the multi-spectral camera to gather more data. We also flew the Bramor to capture more of the river and the flooding that had occurred around it. Beforehand, me and Ian packed a parachute since the time after packing the previous one had expired. The manual states that there cannot be more than 24 hours between packing the parachute and release. This is mostly due to the creases in the parachute itself. If the creases stay then it can hinder the opening of the parachute, potentially causing a mishap. Teams were the same as last time and everyone participated in the pre-flight checklist.

Parachute packed and ready. The dressing of the cords, while important,
is not as important as making sure the strands do not cross over. The overall
quality of this chute was great and opened up perfectly.

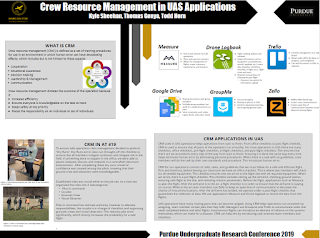
This week me, Thomas, and Kyle started to make good headway on the poster. The poster is for the SATT presentation of capstone classes for the technology department. Initially, our poster was going to talk about the similarities and differences between Drone Logbook and Measure. Due to the weather, we were not able to get many flights in to test out the two software. We shifted our focus to crew resource management within UAS operations. Below you will see the final product. As you can see we first define what CRM is and how it applies to many applications, not just UAS. This is to introduce people into this concept that might not know what it was beforehand. Then on the right of the poster we point out different applications we used in our operations. Measure, Drone logbook, Trello, Google Drive, Groupme, Zello are all utilized by our operation in some aspect that was notable. We gave we brief description of each app after some constructive criticism from class. Our rough draft did not have any description so viewers might not have any idea what some of these apps were. Finally on the bottom right we described how CRM effected our day to day operations. In there talks about how we used roles, leadership, and crews to hand out roles to team members. The checklists that we used and how we used them were also highlighted.

The final draft for the poster symposium. Class photos of our flight manager
(Kyle) training the class on the Getac. The poster highlights how we use CRM
in UAS operations at Purdue.

Monday, April 1, 2019

Week 11

The weather was great and the planes were ready. For this week we were finally able to complete a mission with the Bramor. When I first entered the room I was tasked with packing the parachute. The parachute is the only way to land the Bramor so it is imperative that it is done with care. The parachute must be packed within 24 hours of the mission. This disrupts the operation because me and Ian must come in early to pack the chute. Me and Ian were tasked with packing two chutes. We had already packed parachutes before so we made quick work with it. While we packed the other groups went out to the test site to set up. As we arrived the groups were performing the pre-flight checklist. I took part in setting up the catapult and airframe since I am the lead flight engineer. Although I was helping, I did not take full control of it. I supervised it since I already knew the ins and outs of the setup. I wanted someone else to do it so they could gain some experience setting up. At this point in the set up, we were aiming the catapult so we could take off. One thing we could change about what we did was placement on setting up. The group that went out set up the catapult in a spot where we could only launch it North. This was highly problematic because we had a tail wind. At the time of setting up, wind speed was negligible, but once it got closer to launch the wind speed picked up. Me and Ian tried to move the catapult so instead of a tail wind it would be a crosswind. We couldn’t launch into a headwind due to obstacles. We set the Bramor onto the catapult with it ready to launch. After we winched the rubbers on the catapult, we were ready to launch. I was tasked with pulling the release pin. We set the aircraft into launch mode and I pulled the lever for release, and it took off.

The Bramor set up, catapult not armed. The catapult in this photo
is set up incorrectly. This is the set up with a tail wind.

The launch was rough, with the tail/cross wind that picked up, the Bramor also didn’t even take off. It was released off the catapult and immediately started sloping towards the ground. The motor eventually picked up the slack and took off. Me and Thomas were visual observers so we went to our spot in the parking lot. During the whole flight, my group and the launch group could see the aircraft. This could mean that we didn’t need the two other visual observing groups. After the mission was completed, it was time to land with the parachute. The Bramor rallied then started it descent to land. It popped the parachute and started descending. It was gliding very closely to the road, I am not sure what went wrong with the estimate slopes, but it was only about 50 feet from the road. We picked the Bramor up and recovered it safely with no mishaps for our first mission. Other than the parachute being tangled, it was a complete success.

Bramor set up, catapult armed. Catapult ready to launch
the catapult was moved from its last position to prevent a tail wind.
This position had a slight crosswind.